


DJI Terra Activation
Excerpts from the manual for the first steps with DJI Terra
Introduction
DJI Terra comes in 4 versions: Agriculture, Pro, Electricity and Cluster. To purchase DJI Terra, please visit the DJI Online Store or an authorized dealer such as EPOTRONIC. After purchase, licenses must be activated and bound to devices using DJI Terra.
Download and Start
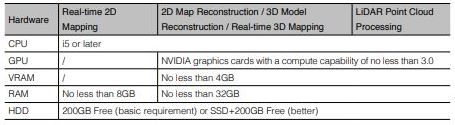
DJI Terra is supported by Windows 7 or later.
Visit dji.com to download and install the software. Launch DJI Terra and log in with your DJI account. If an offline license was purchased, offline login is required.
Buy licenses
To purchase DJI Terra Agriculture, Pro, Upgrade and Maintenance Fee, Electricity (Online Versions), visit the DJI Online Store (https://store.dji.com), search for DJI Terra and select the desired version.
To purchase DJI Terra Pro (online and offline versions) and Upgrade and Maintenance Fee, DJI Terra Electricity (online version), or DJI Terra Cluster (offline version) and Upgrade and Maintenance Fee, visit https://www.dji.com/dji-terra . Enter your information in the contact form and wait for a response from an authorized DJI dealer.
The cluster version only supports offline login. Users can contact an authorized DJI dealer via the product page on the official DJI website to purchase an offline license and choose from various contingents for working use.
Dedicate preparation before using DJI Terra for more information on how to activate an offline license and how to bind a device to it.
Start DJI Terra --> Activate License(s) --> Buy new License(s). Users will be connected to the official DJI website for details about the features of different versions.
Activating online licenses and binding devices to them
License activation and device binding is required to use the licenses with the desired DJI accounts and on the desired computers. Activate licenses in DJI Terra or via activation link. License can be bound to computer after activation. Contact DJI Support to unbind if needed.
DJI Terra --> Activated License(s) --> Activate a New License - A window will appear immediately.
or https://license.dji.com/en
Enter the activation code you received and the DJI account you wish to use the license with, then click Activate.
After successful activation, look at the ID, expiration date and device binding status of the license. If the link was used to activate the license, enter the activated license again to see the information.
Click "Device Binding", then click "Bind" to bind the license to the computer in use. "Bound" is displayed next to the license of the corresponding ID in "Activated License(s)".
Cluster reconstruction
Setting up the environment
For more information on the required equipment and how to set up the cluster version, see Preparing before using DJI Terra. Set up cluster version. https://www.dji.com/downloads/products/dji-terra
Use
Control device: the device on which DJI Terra Cluster is running. On the control device, users can configure cluster rebuild settings, select working devices, and view the status of rebuild missions.
Working devices: the devices on the local network that can be assigned to reconstruction missions by the control device for reconstruction missions.
Control device operation
Make sure you have imported the license, enabled the cluster version, and logged in offline.
Cluster reconstruction settings
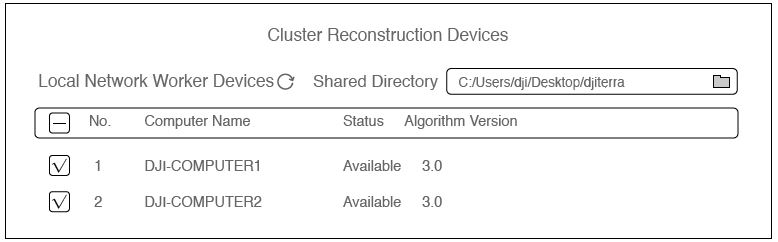
On the DJI Terra home page, click the upper right corner to access the Cluster Reconstruction page: Device page.
Shared Directory
Set the shared directory. It is recommended to FIX the directory to the network-attached storage (NAS). For more information, see Preparing before using DJI Terra.
The shared directory and the directory where the photos for reconstruction are located must have the same type of network path or drive letter path.
If a drive letter path is used as the shared directory, the drive letter of the network location must match the drive letter mapped on the control device.
Local network workstations
After entering the page, the software automatically searches for the enabled working devices on the local network and lists the name, status and algorithm version of the found devices. Click on to update the search results and the status of the working devices. For more information on activating work devices, see "Work devices more information on activating work devices.
1. computer name: displays the name of the working device.
2. Status: Indicates whether the work device is available or busy. Only available devices can be selected. Click to the right of the status to reset the work device to available if it incorrectly shows as busy. shows as busy.
3. algorithm version: Displays the algorithm version of the working device. Blue indicates that it is the same version as the control device, while red indicates that it is different from the control device. Only devices that have the same algorithm version as the control device can be selected.
4. check the box in front of the number to select the device as a working device for cluster reconstruction. Reconstruction. Click Apply to save the settings after configuration.
Reconstruction mission management
Select cluster calculation as the calculation method, select working devices and start reconstruction missions. Click the Home page to access the Reconstruction Missions management page.
Cluster reconstruction continued
In the upper part of the page the reconstruction missions queue is displayed. Users can view the name, type of reconstruction and status of each mission. The mission can be paused or canceled in the Operation section. Click = and drag to rearrange the missions. The lower part of the page lists the local network work devices. The display is similar to the display on the Cluster Reconstruction Devices page in Cluster Reconstruction Settings. If the status of the working device is abnormal, click Release under the Device Operations to release the working device. A working device cannot be used for the same reconstruction job after it is released. released. Translated with www.DeepL.com/Translator (free version)
Working device operations
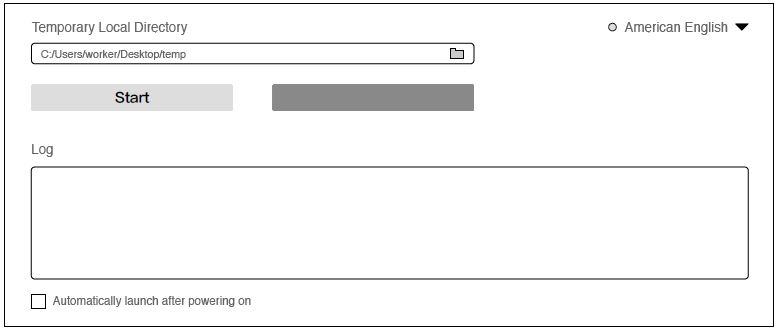
The DJI Terra Engine is automatically installed on the working device when DJI Terra is installed. Users can find DJITerraEngine.exe in the cluster folder of the installation directory or go to the DJI product folder in the Start menu.
1. temporary local directory: used for temporary storage while the working device performs reconstruction. Select a local directory on the work device as the temporary local directory and make sure there is enough storage space.
2. start/stop: to start or stop the working device. Once a working device is started, it can be searched by the control device on the local network and used by the control device on the local network.
3. log: Prints the logs of the working device.
4. language switch: click the language switch in the upper right corner to change the language.
5. auto start after power on: If enabled, DJI Terra Engine will start automatically after the working device is powered on.
Cluster reconstruction procedure
1. make sure that you have already configured the cluster reconstruction parameters and selected the working devices. 2.
2. start the reconstruction according to the normal procedure for reconstruction missions and make sure that you are using cluster reconstruction.
3. Show the progress rate of the mission and the status of the working devices in the reconstruction mission management.
4. if automatic copying of results to the control device is disabled and the control device is connected to the shared directory after the still, users can view the reconstruction results the reconstruction results in DJI Terra and also in the files in the corresponding folders. If automatic copying of results to the control device is enabled, users can view the reconstruction results reconstruction results in DJI Terra without being connected to the shared directory, and also the files in the corresponding folders.
Translated with www.DeepL.com/Translator (free version)

Connect the remote control to the aircraft for Phantom 4 RTK / Phantom 4 Pro V2.0 / Phantom 4 Pro+ V2.0
Connect the remote control to the computer using a USB-C cable or a micro USB cable. Then connect the remote control and the drone to the power and power them both up. The location and status information will be shown on the DJI Terra display.
Other devices
Change the remote control communication mode to PC mode.
Power up the remote control. Make sure the flight mode is set to P mode. Then connect the remote to the PC via micro USB.
Launch DJI Terra, go to Settings and select "Switch to PC Mode." The remote's status LED will initially flash red and then flash green once you have connected the flight unit. Reboot the remote and enable PC Mode.
Remove the micro USB cable. Connect the remote control to the PC with a male-male USB cable, then start the flight device. The location and status information of the drone will be shown in the display of DJI Terra.
If you want to use DJI GO 4 or other apps on a mobile device connected to a USB port on the remote control, make sure to set the remote control communication mode to App mode in DJI Terra. The switching procedure is the same as mentioned above. The only difference is that App Mode is enabled.